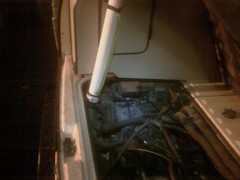
I have built my own "Libby Bong" thanks to advice from the Samba and a very awesome reader of my blog - thanks Ron! This brilliant little contraption makes it possible to bleed my coolant system from the comfort of my own street without having to jack up the front of my van. A little while ago I replaced my temp II sensor and my temp sender in the thermostat housing of the Vanagon. This went just fine but since I couldn't raise my van high enough to follow the procedure outlined in the Bentley manual I was concerned that I had left air bubbles in my coolant system. I found the details of how to build it over on www.thesamba.com. A guy by the name of Libby devised a simple contraption from a couple of parts available at the Home Depot that artificially raises the level of the expansion tank which allows you to just use gravity to force all of the air into the bleeding column in the radiator. It is just a section of 2" PVC pipe with a 2" to 1.5" "PlumbQuik" connector that clamps to the top of the coolant expansion tank. The brilliant part is the 1/2" OD plastic tubing that inserts just above connector, goes into the expansion tank, and is attached to the top of the PVC pipe. Once you bleed the coolant system you then detach tube from the top, insert it into a coolant jug, and lower it below the expansion tank. That causes all of the coolant remaining in the PVC column to empty back into the coolant jug. Once all of the coolant is out of the column you top off the expansion tank with coolant, replace the expansion cap, and drive off without any air in your coolant system.
The other news from this weekend is that it looks like I've finally solved my freaking out temperature gauge. Thanks to a reader comment from this blog (thanks Jed!) I decided to remove the sensor from the expansion tank and check it for corrosion. Sure enough the probes were covered in some nastiness. I used my trusty wire brush to get them looking nice and shiny again. Now my coolant light no longer blinks! I didn't even have to replace any parts.
Sunday, November 30, 2008
Friday, November 21, 2008
Waiting For The Mail
I've noticed that I never want to drive my Vanagon more than when it is undrivable. It has been parked in front of my house all week just taunting me. My replacement fuel pressure regulator just can't seem to get here fast enough. I really wish that GoWesty had one in stock - those guys are super fast. I ended up buying one from Van-Cafe. They are generally awesome and send cookies along with every order but the UPS ground only option from California does make delivery times take a lot longer than I would like. I should finally get it on Monday. At least they are faster than Bus Depot. I ordered some POR-15 and a replacement panel for my rusty kitchen rocker like weeks ago and still have yet to hear from them. Maybe they didn't actually have the panel in stock? It doesn't really matter though because I'm not ready to cut that bad metal out right this minute anyway.
I do have a tiny bit of a paint job update. It may be my imagination but I swear my Vanagon is getting darker as the paint settles and breathes. This is really good because I actually wanted it to be a darker color than it was right after I applied the paint. I really do need one more coat of paint on too but I may just go ahead and do a 1500 pass and buff it out for the winter. I can always go back next spring when it warms up and do a few more coats. I don't mind thin spots as much as the heavy orange peel that I've got now. I may end up doing that wet sanding this weekend. Who knows - I might even post some pictures...
Sunday, November 16, 2008
One More Thing About Headlights
I realized that I didn't do a very good job of explaining what I did to my headlights. Basically I just bought the power boosting kit from www.gowesty.com along with some new higher wattage halogen bulbs. The instructions that came with the kit were top notch and made the install very very easy. Just be sure to actually have a crimping tool if you are going to do the kit install yourself. I have since driven the Vanagon at night and in the rain and I am amazed at how much better the visibility is. I strongly suggest you do this upgrade yourself.
Back To The Engine!
This weekend was filled with rain, wind, and cold weather. It was not the time for doing more work on the paint so I decided instead to focus on a few mechanical issues that I've been having lately. First off I don't feel like my engine has been running as smoothly since I replaced my exhaust system. I don't think this is a result of the exhaust system per say but that was around the time that I stopped driving the Vanagon regularly. If I've learned anything from owning a Vanagon it is that old vehicles like to be driven. Anyway, I had a bit of a rough idle and I'm seeing condensation and white smoke out of my exhaust when I start up the van. Something is not right.
My first action was to replace my O2 sensor again a few weeks ago. This helped a lot with the sound of the engine but it did not fix all of my problems. I'm confident that the O2 sensor that I put in when I replaced my exhaust was faulty but that was not the entire story. So rather than properly diagnosing the problem I decided to just keep throwing parts at my issue. Fortunately the parts I decided to throw were really cheap. This weekend I replaced the two temp sensors on my thermostat housing in an attempt to further smooth out my engine.
This leads me to the other issue that I have seen lately. Typically when I start the van my temperature warning light starts blinking immediately and my temperature gauge immediately rockets all the way to the right. My first action was to check my coolant level to make sure that my engine had enough coolant. I was able to verify that the coolant was fine and that was not the reason the warning light was coming on. A strange thing I noticed about the indicator light was that at times the gauge functioned normally and then at times it would freak out, blink, and rocket all the way to the right. This leads me to believe that I have an electrical problem or the sensor itself is broken. Since the part is cheap I went ahead and replaced the sensor at the thermostat housing. I also noticed that the wire attached to that sensor was worn and it looked like the connector was about to fall off. I went ahead and snipped the wire to expose some fresh wire and added a new connector. I also replaced the temp II sensor since all of the message boards so to just replace the thing if it even might be broken. I believe that the second sensor provides information to the fuel injection system which and that if it is not functioning properly your engine will run rough. While I was dumping coolant in the street I figured I might as well replace mine as well.
When I fired up the van again to bleed the coolant system and to verify that everything was put back together soundly I was impressed with how smooth the engine sounded. I then we back to watch the engine run and to rev the engine I noticed that my fuel pressure regularly was dripping something. Since I don't know what else a fuel pressure regulator could be dripping other than fuel I became concerned. I turned off the engine and went in the house to get a bunch of clean paper towels. Looking at the fuel pressure regulator it did not look like any of the fuel lines going into it were having problems but I wanted to be sure. I wrapped a paper towel around each of the lines at the point where they connected with the fuel pressure regulator and then another under the regulator itself. I fired up the engine again and waited for a minute. After I started seeing the liquid on the paper towel I turned the engine off and inspected my experiment. I should also add that when I filled up on Friday I noticed that my miles per gallon had dropped to 16 from 20 so I was already concerned about a potential fuel leak. Sure enough the fuel pressure regulator itself was seeping fuel right from the seam in the center. I don't know if this is a common problem but I certainly can't drive the Vanagon until I have this problem sorted out.
Later I was telling my Dad about what I had seen and he mentioned that in his experience with Volvos that often before the fuel pressure regulator fails it tends to flood the engine with fuel - I wonder if this is the same type of issue that I am seeing. Regardless, I don't think it will be a good idea to drive the Vanagon again until I get myself a new fuel pressure regulator.
Wednesday, November 12, 2008
Lunchtime Upgrade
Today during my lunch break I finally got around to upgrading the wiring for my headlight and replaced the bulbs with a higher wattage bulb. It really wasn't too bad of a job but hooking in the new wiring was super cramped. It is hard to access the back of the fuse panel. After I checked that my new wiring worked I also went ahead and replaced the headlights. Total time was around an hour. I can't wait for it to get dark so I can see how much of a difference it makes. I was really getting tired of not being able to see at night.
I Learned Something
This past weekend I ended up getting a lot more done on the Vanagon than I was anticipating. I sanded and painted my rear bumper and I solved a major problem with my window seals. On Saturday I hurriedly painted the rear bumper and I am not very happy with it at all. There was some fairly serious surface rust on it and I didn't have a grind wheel in good enough condition to really clean it up. I ended up using a wire wheel which is good at getting out all the rust but it leaves the metal riddled with pits where the rust used to be. I thought a high build rattle can auto primer that I have been using would be enough to clean it up but I was wrong. Sadly the pits show through the final satin black paint so I think I'm going to have to strip it down again and use some filler to get it all sorted out.
The better news though is that I figured out how to fix up my window rubbers. Early on in the painting process I masked them all off and left the tape on for a week. It was really hot that week (wow I have been at this stupid paint job for a long time) and the adhesive from the masking tape kind of melded with the rubber in the window seals. That left me with tape that I simply could not peel off. I ignored it for a while but it has gotten to the point where that tape was starting to really annoy me. My general approach to restoration is to just fix whatever is annoying me the most at that time so this weekend I decided to do something about it.
My first plan was to use some Goo Gone and a rag to scrub off that adhesive. That did pretty much nothing. Next I tried using a plastic pot scrubber - nothing. Then I tried some steel wool - nothing. Next I tried a small wire brush - that was just scratching the hell out of my rubbers so I quickly ditched that idea. Finally I decided to try some sand paper and kind of wet sand with Goo Gone instead of water. That was working but it took a really long time on the places where there was a lot of tape left. However I noticed that the sand paper left the rubber looking nice and new and it was able to easily remove the overspray from my previous owners horrible paint job and the few places here and there where I got paint on the rubbers. The trouble was keeping the sand paper off of the body since I didn't want to scratch the paint. That was when I noticed the small dry wall putty knife that I had in the tool box. It is a 1" knife that I noticed I could easily slide under the edge of the rubber and then could go to town on rubber lip with the sand paper and really clean it up. I also noticed that the blade had enough flex to it that I could use it to scrape up the bulk of the old masking tape without harming the rubbers. So in the end my process was to use the putty knife to scrape as much of the masking tape off as possible and then use it to lift the lip while I sanded the rubber down a bit with 120 grit sand paper. Once I had taken a layer off of the window rubber I used some 303 Aerospace Protectant to reseal the rubber and protect it from UV damage. This left my rubbers looking like new!
Thursday, November 6, 2008
I've gone too long without posting
I forgot to update after last weekend's work. I got in two days of painting on the van and am now ready for another 800 wet sanding pass. I still don't have complete opacity so it looks like I'm going to have to do some more painting passes. The van looks to be one color from a distance but when you get closer you can certainly see some issues. I have really grown a strong dislike for whoever painted this thing blue in the first place. Soo... much... work... This weekend we're having some family in town so I probably won't get in much time on the Vanagon. Plus the weather has been terrible here for paint this past week so I really don't mind giving the paint another week of drying time before I get in there and knock it back again.
One important bit of advice I can offer is to never leave your masking tape on your window rubbers for longer than you have to. I left some tape on for a week and the adhesive sort of melded with the rubbers. Now I've got masking trash all over my window rubbers and it is a real pain to clean off. I haven't gotten out the Goo Gone yet but I'm hoping that will make all the difference. If that doesn't work then I'm considering trying to sand the rubbers. Who knows if that will work but it seemed like something worth trying.
Subscribe to:
Posts (Atom)